*Sigh* I really don't know how I get so behind. I don't think Midge and I have sat down together in over a month! I have been knitting a lot...and working more...and actually keeping the house clean. I guess sewing was the one that had to give.
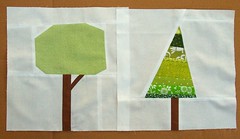
September's theme for do.Good Stitches was trees. I so loved making houses for other bees. These trees were just as fun and a nice little tweak to a popular new quilt.
I think the tree to the left is a nice climbing tree and has a great place for a bird to make a nest. The pine tree on the right is silly and slightly wonky and interesting to look at with all the different fabrics.

Thursday, October 7, 2010
Saturday, September 25, 2010
Dress Plans
 I was running a few minutes early for work one day so I stopped by the Goodwill that is on the way. Only having a limited so I headed straight for the linens. This plaid fabric caught my eye right away. I got about 4 yards for $1.99! And it matches my new favorite shoes (which I also got new from a different Goodwill, but they are also sold at Target).
 {Photo from
 My plan is to make Simplicity 2591 version C. I like the retro look, full-ish skirt and coverage on the top. The fabric is fairly light-weight and should be good in warmer weather. I plan to get some fun, bright tights to wear under the dress in the fall and winter. I have already been thinking of knitting this cardigan in yellow or pink to go with some other dresses and it should work with this dress, too.
Hopefully I will have the time to make this dress this weekend. But that will have to be after mowing the lawn, sweeping the floor (dang these dogs shed!) and staking our tomato plants. =]
Hopefully I will have the time to make this dress this weekend. But that will have to be after mowing the lawn, sweeping the floor (dang these dogs shed!) and staking our tomato plants. =]
Thursday, August 19, 2010
It's been handled
 {Mouse needs a better look}
This bag is about 10 months in the making. The handles and fabric were part of the haul from Roger's Flea Market last August. I matched the fabrics and handles then pinned out a rough design last October. It promptly got "cleaned up" and put in a box, put on a shelf and forgotten about with two or three of its friends.
 {Camera 1}
I discovered it again while looking through my WIPs box. Over the past couple days it was sewn together, ripped apart and resewn. Standard for this visual/tactile learner.
 {Camera 2}
This one is mine, but I think I will utilize the other handles I have and make more of these bags for my Etsy shop. Maybe even a tutorial. We'll see if I can remember to take photos during the next construction. And I think I will make the handle casings a little bigger. And maybe a constrasting fabric. Or some fancy trim. And maybe not sew down the pleats. And maybe a little taper in on the opening to finish off the hexagon shape. Hmmm.
 {All the crap I lug around}
It is large enough to hold my cell phone, keys (on a little leash ala Anne), wallet, notepad, two pens, two Sharpies (actually Shoupies, but I digress), cash (now gone), chap stick and multitude of change in the bottom. All that without looking bulky when closed.
 {RTG}
{RTG}=]
Wednesday, August 18, 2010
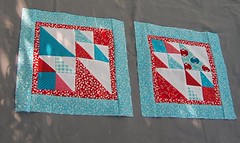
do. Good Stitches ~ August
This block started very differently. I had planned to use this tutorial from the Purl Bee blog, but I couldn't make it fit into the correct size requested in the bee. I did the math wrong.
I ended up just playing with the triangles and squares until I got something I liked. In order to get to the correct 12" x 12" size I added a thin border of red and a thicker border of aqua.
Find out more about this online charity bee on the flickr page. I believe Rachel is still looking for members for spin off circles. =]
Monday, August 16, 2010
FO: Frock Camisole

{Frock Camisole aka Flowy racer back tank}
The other day I finished my Frock in Violet. This is the first garment I have ever knitted and I think it turned out pretty dang good! Racer back tops aren't usually that flattering on me, but I went for it anyway and I am glad I did.
I used nearly 3 whole skeins of Lion Brand Cotton-Ease in Violet for the medium size. One of the skeins is actually one of my first yarn purchases from when I first learned to knit a few years ago. I knew I liked the color, but never knew what to make with it.
 {The back}
I only made two alterations to the pattern. I used 12 stitches for the straps instead of 8. Then I only made them 10" long instead of the 11-3/4" as in the instructions. I needed shorter straps to pull up the armholes. They hung too low and showed my undergarment. Eek!
Next time I would only cast off 4 stitches for the armhole and use them in the straps. I had to use some of the neckline stitches for the straps and I think it would look a little better with a wider neckline.
My Ravelry link, if you're interested. =]
Tuesday, August 10, 2010
50 cents + Flea Market = Happiness
 {Better Homes and Gardens Sewing Book}
 {Inside cover...in all it's 1960s glory}
This little gem cost me 50 cents and I have already gotten return on my investment. I must have spent an hour flipping through this book smiling at the sketches, giggling at the swimsuits and marveling at how far sewing has come and how much it has stayed the same.
 {Convenient sizing charts}
The sizing carts measurements may be the same, but we all know the size number has changed. This is still really useful, of course for vintage patterns, but also for sizing items I make for my nieces who live far, far away.
 {She is so happy with her striped skirt}
The sketches throughout the book kill me. The ladies all have different looks. They are demur, classy and sophisticated. Project Runway would judge them as: She looks fun and like the kind of girl that everybody wants to know.
 {Oh, no!}
 {Ahh, that's it}
In the cutting section the authors discuss how to layout pattern pieces to get check, plaids and stripes to line up at the seams. These cute ladies show wrong and right examples. I love the wrong girl's expression. =O
 {The only brunette!}
I didn't realize it until I saw this little girl, but she is the only brunette in all 360 pages!
 {Wardrobe planning ideas}
I am also loving the sportswear section. The garments considered sportswear are hilarious to me. A shift dress is sportswear. Women's and men's trousers are sportswear. Pleated skirts and halter tops are sportswear. Halter tops! I still giggle at that.
 {Swim suit construction}
I do have plans on making a swim suit for myself, but I promise, it won't have a zipper. =]
Do you have a good vintage sewing guide book?
Monday, August 9, 2010
Frock by Friday ~ Anda
 {Frock by Friday ~ Summer Edition}
About a week ago I decided to join this month's Frock by Friday at Grosgrain. The pattern is available from BurdaStyle for $3.50. The pattern is so simple, but it is nice to just cut and sew.
 {Anda dress}
The pattern is really great. I had to take 1-1/2" off each side because, even with the tie, it looked like I cut arm holes in a potato sack. Not the pattern's fault, I just needed it thinner. I also had to cut off about 6" at the hem, which is not a usual thing for me. I am the same height at the pattern specs, but if I had just hemmed the bottom it would have hit about 2" below my knees. Not flattering for me, and not how the other photos showed the length. The only other alteration I made was to put the tie casing on the inside of the dress. No way was I going to be able to line up the pattern with the casing on the outside like the pattern instructed. I added a 1/4" button hole in the middle of the front piece for the ties to exit.

{Little better view of the fabric}
The fabric was in a bag I bought at a thrift store. (They just put random cuts of yardage in a plastic bag, slap on a price tag and staple it closed. Guaranteed to have some "scary" pieces, but most of the time it is worth the $2-3.) Back to the fabric--no information on the selvage, but I think it is a double knit in polyster. I know, sounds gross, but it is comfortable. It has a tiny pattern of square tiles in black, red, yellow, brown and light blue.
I do recommend the pattern. So, so fast and so, so cute. If I made it again (and I think I will) I would use either a satiny fabric with a big design or a plain old solid knit. And elastic around the waist, not tie. =]
Monday, August 2, 2010
Another Thrift Store Save
 What a nice, little logo. The first time I was this logo was at a St. Vincent's de Paul in PA when Dirty and I were visiting family. The price tag read $2. WHAT?!? $2 for an awesome *PURPLE* suitcase! I had to have it.
 {Bad color in the photo, but still shows off how nice it is}
 {Was this all I was to see of the purple suitcase of loveliness?}
...the latches wouldn't turn. Locked up tight. Neither of the other American Tourister suitcases at the store had keys. What was a girl to do?
We took it to the counter to see if maybe, *maybe* they had extra keys. Nope. But the super nice ladies at the checkout counter said I could have the suitcase--no charge. WAHOO! I figured, worse case I could either try to buy keys on eBay or take it to a locksmith.
Amazingly, at a Goodwill here in town I found another American Tourister (bigger and gray, but still very nice) that had 2 keys. Not 1, but 2. Fingers crossed,I bought it for $4 in the hopes the keys would open my beautiful, purple suitcase.
Well, I couldn't get the key to fit. Dirty's dad tried, his girlfriend tried and still no luck. I gave into the fact we got another nice suitcase for $4. Not a bad deal. Then my Dirty tried...and OPENED the purple suitcase of loveliness!
 {Pretty and pink}
The interior is gorgeous and pink without any weird smells. It looks like it was barely used, but had 6 or 8 straight pins in it, which I found odd.
 {Zippered side pocket and elastic back pocket}
Now I just need somewhere to go! =]
Saturday, July 31, 2010
Spiderwebs for Nichole
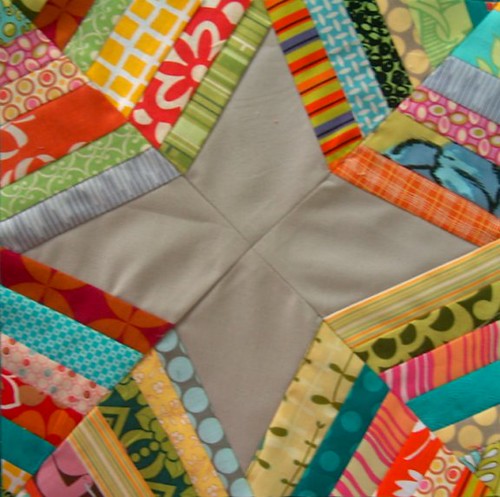
Nichole in the Quilter Bees group asked for spiderweb blocks this month. This was another I-always-wanted-to-make-this block for me. Honestly, I was a little intimidated by spiderwebs, but the tutorial at Quiltville was awesome, again.
Friday, July 30, 2010
Thrift Store Save
 {$2 from Salvation Army. It is handmade by someone else}
Inspired by Kathleen's Thrift Store Thursdays at Grosgrain, I went to the local Salvation Army store on 50% off day and scooped up three great pieces of clothing. Two are dresses I plan to alter and one brand new top that doesn't need anything but the tag removed. Grand total $6. Love it.
 {The back of Granny's house dress}
The first dress I found was Granny's house dress. It is handmade by someone else. I never know why these are donated to thrift stores. It is the second handmade garment I have found while thrifting. (I just realized I never posted about the other super cute handmade dress I found at Goodwill. I will do that soon.) It had a good rough shape, but is way too big and I do like the vintagey fabric. Kind of looks like the 30's repro fabrics.
 {*Gasp* I know!}
I took in the side seams about two inches on each side. I didn't have to alter the hem. I think it hits at a good spot. I tried hard to save the sleeves, even trying to add an otherwise cute elastic gathering, but it looked bad. The sleeves didn't make the cut...or maybe they did. ;]
 {Bad model posing commences}
I also added a 1/4" elastic to the waist line. I zig zag stitched over the elastic and pulled it tight as I was stitching. I really like the gathering around the waist. Very comfortable and better than a tied belt, which always moves on me.
 {Out of order, but marked and pinned for altering}
It would have been a much easier project with a dress form. *hint, hint, Santa* But it worked out all right after a few tries.
 {Pea approves, or is just looking for some love, you be the judge}
I didn't get a good photo, but I covered the sleeve opening with binding made from the side seam castaways. My binding foot made this easy. Part of the collection I got about a year ago.
 {Gratuitous dog photo}
{New back detail}
After all the alterations, the bodice still wasn't sitting right and the back had even more excess fabric than it does now. With a pie cut into the back neck line, commercial bias tape, a made-by-me fabric button and small piece of elastic, even the back got a new look.
It took *way* longer than I anticipated, but I think it was worth it. It can be worn now, as is and be worn into the fall and again in the spring with a little cardigan. Perfect to throw on for work or play when I am running late (which is most of the time). =]
Wednesday, July 28, 2010
Black-Eye Pea's Polamalu Spirit Leg Warmers: FREE Knitting Pattern
 {aka Pea is for Polamalu ~ Ravelry pattern link}
Pea's sister Mouse received the first pair in the series of Pittsburgh Steelers Spirit Leg Warmers. By no means could Pea be left out. No, no. Not Miss Jealousy herself.
 {Checking the offensive set}
Pea's favorite football player is the Steelers Troy Polamalu. She says they have a lot in common. They are both really smart. They are both really fast. They both have to be wherever the ball is and take it away from the other person/dog. If they don't get to the ball first, that other person/dog deserves to be tackled. And if the quarterback/mama/papa throwing the ball is too slow, it can be taken away then, too.
 {The blitz is on!}
This set of leg warmers was constructed a little differently. I chose to go from the bottom cuff up and use intarsia for the numbers. I suck at intarsia and it looked all warped. I frogged them and decided to just do the entire section between the cuffs in gold stockinette then use a duplicate stitch in black for each number. It went together so much faster for me that way. However, if you are better at intarsia than me, I included the charts for that.
 {Prepare to be sacked!}
Again, the do-it-yourself formula for gauge, yarn and needle size can be found here with some tips within the pattern in red. My pattern for "Pea is for Polamalu" in Pea's size (medium dog) is below.
 {Time out}
Steelers Striped Leg Warmers (for dogs)
- Suggested Yarn: I Love This Yarn! (available at Hobby Lobby) or other aran/worested weight yarn (2 colors, Black and Yellow in this project*)
- Yardage needed: Specifically, not much. I don't have the exact yardage calculated. Again, I am a slacker.
- Materials: US 7 dpns (or size needed to obtain gauge), tapestry needle
- Gauge: 5 stitches and 7 rows over 1 inch in stockinette stitch
- Finished dimensions: 8" around top cuff tapering to 6" around bottom cuff and about 9" in length

{Pea is for Polamalu}
Abbreviations: k-knit, p-purl, M1B-make 1 back, M1F-make 1 front (See knittinghelp.com for instructions and video of the increase stitches. They explain it way better than me.)
If doing the color work in intarsia, the numbers start at row 7. The charts at the end of the pattern have all the color work directions and a different way to divide stitches per needle.
Loosely cast on 24 stitches in color A (black). Divide evenly between 3 dpns (8 sts per needle). Place marker and join in the round. P.S. Don't twist the stitches.
Rows 1-4 (Color A): *K2, P2* to end
Rows 5-35 (Color B for rows 3-45): Knit all stitches
Row 36 and all increase rounds: k1, M1B, k until 1 stitch before end of round, M1F, k1 (26 total stitches)
Rows 37-38: knit all stitches
Row 39: increase round (28 total stitches)
Rows 40-41: knit all stitches
Row 42: increase round (30 total stitches)
Rows 43-44: knit all stitches
Row 45: increase round (32 total stitches)
Row 46 (Color A): knit all stitches
Rows 47-54: *k2, p2* to end
Finishing: Loosely bind off all stitches. Use the charts and duplicate stitch (Color A) to create the numbers on each leg warmer. One number per leg warmer.
 {Click each image enlarge. Charts for intarsia and duplicate stitch}

Please let me know if you make these leg warmers! (Or if you have any problem with the pattern.) Leave a comment or message me on Ravelry. I am drizzle and design as Hermione J. Schwartz.
*Colors and jersey numbers can be swapped, but let's not tell Pea. =]
Monday, July 26, 2010
SSS2 - Wonky Stars for Rebecca
I am shockingly on time with this month's SSS2 block for Rebecca. Putting together her wonky maverick stars required purchasing a new tool. Three cuts into the first block, this happened:
 {Not helpful}
  {Very helpful}
  {Also helpful}
 {Not helpful}
My bionic hand strength snapped my rotary cutter in two. I've had it for several (5?) years so I guess I got all I could from it. Armed with a 40% off coupon, I ran out to the store to get a new one.
 {Very helpful}
Judging from the new handle design, I am probably not the only one to destroy her Fiskars rotary cutter. I do really like the new one. First, a new blade is always heavenly. I also like the safety lock. Press the larger button on top to engage blade. Press the little button on the side to shoosh it back up. Fancy.
 {Also helpful}
With my new rotary cutter and one of my trusty sidekicks, I was ready to punch out some quilt blocks.

{Happy and summery wonky stars}
I used the tutorial from Quiltville. Three of the blocks are 10" and one (the first) got a little skimpy at 9.5" square. I am sending it anyway, just in case it can be used. Loved, loved, loved making these blocks. They have been on my "to stitch" list for ages, but I made one until today. I know there will be more of these babies in my future.
My next to-do block is a spider web from Quiltville, too. Should do those tomorrow-ish. =]
Saturday, July 24, 2010
Mr. T Starter Kit
Nicknames are just a part of life in our house. Pets and people both get multiple nicknames, just to confuse everyone. For example, Dirty and his buddies call everyone Johnny. Instead of man or dude you are Johnny...or Papa...or Mama. They call me Drizzle, Driz, A-drizzle, Squaw, Pip, etc. Dirty has a friend we call Lou, Louie, Uncle Louie or Grandpa, along with occasionally calling him by his real name (which is actually his middle name, but whatever).
Clicky the Moose (he's a dog) was originally named One Time, but then got Clicky the Moose, Moose, Moosey, Moosey-Moose, Clicky the Goose, Clicky the Goat, etc. He comes to all of them but One Time.
 {Jeffery T always requires a pillow}
One of Jeffery T's nicknames is Mr. T (as in the original A*Team). I decided that he needed a gold color. Dirty calls it his Mr. T starter set.
 {Before--mostly for the hardware}
  {Mr. T starter kit}
I had a FQ of a gold fabric with shiny gold threads weaved through it. Pretty ugly by itself, but perfect for the starter kit.
 {Sporting his Mr. T starter kit and watching a bird}
 I cut a strip about 1" thick, folded it like bias tape and stitched the long side closed. I looped it through the break-away clip and snapped it on T.
 {I pity the fool!}
T loves it. =]
Subscribe to:
Posts (Atom)