Showing posts with label knitting. Show all posts

Monday, January 17, 2011

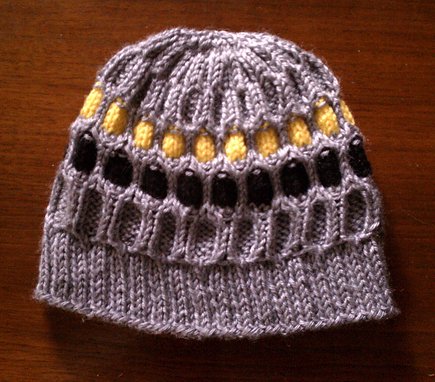
NFL Breast Cancer Awareness Knit Beanie **Free Pattern**

Several months ago one of the members of the Knit Black and Gold group on Ravelry posted a photo this beanie. She had seen it at a game, but knew it could be handmade for far less than the $20+ price tag. I worked on reverse engineering it off and on and, with a little help from other Steelers fans, we got it all worked out.

*~*~*~*~*~*

This pattern was reverse engineered with the help of Ellisha (ish174), Annie (trainergirl15 and Liz (steelerbear). The original beanie was sold during the NFL’s 2010 “A Crucial Catch” Breast Cancer Awareness campaign. Proceeds from merchandise sales benefited the America Cancer Society and other team charities. If you choose to knit this hat, please consider knitting another and donating it to your local chapter of the America Cancer Society, a local breast cancer treatment facility or one of your favorite team’s charities.

*~*~*~*~*~*
Materials
  • Worsted weight yarn in 3 different colors
  • US 8 needles – 16” circulars and/or dpns
  • Gauge: 6 sts/inch in pattern on US 8

Abbrivations

  • K-Knit
  • P-Purl
  • p2tog - purl 2 stitches together
  • k2tog - knit 2 sts together
  • ssk – slip 2 sts knitwise then knit them together
  • C1 over 2 right - Slip 2 sts to cable needle holding in back, K1, P2 from cable needle (needleless-hold yarn in front when slipping)
  • C1 over 2 left - Slip 1 stitch to cable needle holding in front, P2, K1 from cable needle (needleless-hold yarn in back when slipping)
  • MC – main color of yarn
  • CC1 – contrasting color 1
  • CC2 – contrasting color 2

Tackling Dummy Stitch Pattern

Round 1: *C1 over 2 left, C1 over 2 right* to end
Rounds 2-7: *P2, K2, P2* to end
Rounds 8: *C1 over 2 right, C1 over 2 left* to end
Rounds 9-14: *K1, P4, K1* to end

Instructions
CO 108 (120) sts with MC, join in the round

Work *K2, P1* for about 1-1/2"

Set up row: *K1, P4, K1* to end of round

Work rounds 1-8 of Tackling Dummy Stitch Pattern once in MC

Rounds 9-13: *K1 with MC, K4 with CC1, K1 with MC* to end

Round 14: With MC *K1, P4, K1* to end

Round 15: With MC *C1 over 2 left, C1 over 2 right* to end

Round 16-20: *K2 with CC2, K2 with MC, K2 with CC2* to end

Round 21: With MC *P2, K2, P2* to end

Continue working Tackling Dummy Stitch Pattern with round 8 using just the MC.

Complete a total of 5 pattern repeats before decreases (1MC, 1 CC1, 1CC2, 2 MC)

Work just round 1 of Tackling Dummy stitch pattern before starting decreases.

**Decreases for 108 sts ONLY**
Decrease row 1 (D1): Move last stitch in previous row to be first stitch of decrease round. *p2tog, p1, k2, p1* (90 stitches remain)
D2: *P3, K2* to end
D3: *p2tog, K2, P1* (72 sts remain)
D4: *p1, K2, P1* to last stitch
D5: move last of round to first stitch of this round, *p2tog, k2* (54 sts remain)
D6: *ssk, k2tog* (18 sts remain)
D7: k2tog to end (9 sts remain)

** Decreases for 120 sts ONLY **
D1: move last st to be first stitch of the round, *p2tog, p1, k2, p1* (90 st)
D2: knit pattern as established *p3, k2*
D3: *p2tog, k2, p1* around (72 st)
D4: knit pattern as established *p2, k2*
D5: move last st to be first st of the round, *p2tog, k2* (54 st)
D6: knit pattern as established *p1, k2*
D7: *k2tog, k1* around (36 st)
D8: k all stitches
D9: *k4, k2tog* around (30 st)
D10: *k3, k2tog* around (24 st)
D11: *k2, k2tog* around (18 st)
D12: *k1, k2tog* around (12 st)
D13: k2tog (6 sts)

** Finishing **
Cut the yarn leaving enough to thread through the remaining sts. Sinch live sts together and weave in all ends. =]

Monday, August 16, 2010

FO: Frock Camisole


{Frock Camisole aka Flowy racer back tank}
The other day I finished my Frock in Violet. This is the first garment I have ever knitted and I think it turned out pretty dang good! Racer back tops aren't usually that flattering on me, but I went for it anyway and I am glad I did.
I used nearly 3 whole skeins of Lion Brand Cotton-Ease in Violet for the medium size. One of the skeins is actually one of my first yarn purchases from when I first learned to knit a few years ago. I knew I liked the color, but never knew what to make with it.
{The back}
I only made two alterations to the pattern. I used 12 stitches for the straps instead of 8. Then I only made them 10" long instead of the 11-3/4" as in the instructions. I needed shorter straps to pull up the armholes. They hung too low and showed my undergarment. Eek!
Next time I would only cast off 4 stitches for the armhole and use them in the straps. I had to use some of the neckline stitches for the straps and I think it would look a little better with a wider neckline.

My Ravelry link, if you're interested. =]

Wednesday, July 28, 2010

Black-Eye Pea's Polamalu Spirit Leg Warmers: FREE Knitting Pattern

{aka Pea is for Polamalu ~ Ravelry pattern link}
Pea's sister Mouse received the first pair in the series of Pittsburgh Steelers Spirit Leg Warmers. By no means could Pea be left out. No, no. Not Miss Jealousy herself.
{Checking the offensive set}
Pea's favorite football player is the Steelers Troy Polamalu. She says they have a lot in common. They are both really smart. They are both really fast. They both have to be wherever the ball is and take it away from the other person/dog. If they don't get to the ball first, that other person/dog deserves to be tackled. And if the quarterback/mama/papa throwing the ball is too slow, it can be taken away then, too.
{The blitz is on!}
This set of leg warmers was constructed a little differently. I chose to go from the bottom cuff up and use intarsia for the numbers. I suck at intarsia and it looked all warped. I frogged them and decided to just do the entire section between the cuffs in gold stockinette then use a duplicate stitch in black for each number. It went together so much faster for me that way. However, if you are better at intarsia than me, I included the charts for that.
{Prepare to be sacked!}
Again, the do-it-yourself formula for gauge, yarn and needle size can be found here with some tips within the pattern in red. My pattern for "Pea is for Polamalu" in Pea's size (medium dog) is below.

{Time out}

Steelers Striped Leg Warmers (for dogs)

Ravelry pattern link

  • Suggested Yarn: I Love This Yarn! (available at Hobby Lobby) or other aran/worested weight yarn (2 colors, Black and Yellow in this project*)
  • Yardage needed: Specifically, not much. I don't have the exact yardage calculated. Again, I am a slacker.
  • Materials: US 7 dpns (or size needed to obtain gauge), tapestry needle
  • Gauge: 5 stitches and 7 rows over 1 inch in stockinette stitch
  • Finished dimensions: 8" around top cuff tapering to 6" around bottom cuff and about 9" in length

{Pea is for Polamalu}

Abbreviations: k-knit, p-purl, M1B-make 1 back, M1F-make 1 front (See knittinghelp.com for instructions and video of the increase stitches. They explain it way better than me.)

If doing the color work in intarsia, the numbers start at row 7. The charts at the end of the pattern have all the color work directions and a different way to divide stitches per needle.

Loosely cast on 24 stitches in color A (black). Divide evenly between 3 dpns (8 sts per needle). Place marker and join in the round. P.S. Don't twist the stitches.

Rows 1-4 (Color A): *K2, P2* to end

Rows 5-35 (Color B for rows 3-45): Knit all stitches

Row 36 and all increase rounds: k1, M1B, k until 1 stitch before end of round, M1F, k1 (26 total stitches)

Rows 37-38: knit all stitches

Row 39: increase round (28 total stitches)

Rows 40-41: knit all stitches

Row 42: increase round (30 total stitches)

Rows 43-44: knit all stitches

Row 45: increase round (32 total stitches)

Row 46 (Color A): knit all stitches

Rows 47-54: *k2, p2* to end

Finishing: Loosely bind off all stitches. Use the charts and duplicate stitch (Color A) to create the numbers on each leg warmer. One number per leg warmer.

{Click each image enlarge. Charts for intarsia and duplicate stitch}


Please let me know if you make these leg warmers! (Or if you have any problem with the pattern.) Leave a comment or message me on Ravelry. I am drizzle and design as Hermione J. Schwartz.

*Colors and jersey numbers can be swapped, but let's not tell Pea. =]

Thursday, July 15, 2010

Mouse's Steelers Striped Leg Warmers: Knit Pattern

{Mouse's Steelers Gear}


Living in a warm weather climate, my dogs find it difficult to show their team spirit (Steelers spirit, that is) during the football season. The season starts in August (it is hot here) and continues through September (hot), October (still hot), November (warm to not that hot) and into December and January (sort of cool, except that one week that is it pretty cold). Needless to say, those cute doggie sweaters are out and a simple little collar and leash combo just doesn't cut it.

Mouse --she's a dog--requested a pair of Steelers striped leg warmers she can wear during the games and on walks when it starts to get chilly. Who am I to deny my dog Steelers gear?


{She says, what other colors are there?}

Thus the Steelers Striped Leg Warmers pattern was created. We (Mouse and I) decided on a classic black and gold stripe with 2x2 ribbing at the cuffs. Mouse says she supposes that the leg warmers could be made in other colors, but she doesn't know why you'd want to do that. ;]

{I'm ready for some football!}

The leg warmers are made from two colors of acrylic yarn for the washablity and longevity acrylic supplies. Additionally, our climate doesn't necessitate wool or wool blends for 99% of the year and I didn't want to cause overheating issues. Sweaty paws, yuck! If we lived in say...Pittsburgh...I would definitely make another pair in a superwash wool. I used size US7 dpns to get a nice fabric.

{Mesmerized by the game}

The pattern was written specifically for Mouse's legs. They measure 8" in circumference just under her elbow joint and taper down to 6" in circumference at her wrist. The total length is about 10". Mouse is what I consider to be a medium size dog bordering on largish. She's a 65 pound American Bulldog. I say medium because she isn't the largest or smallest dog we've had. The pattern (below) discusses gauge and has an equation for customizing the size to different leg circumferences.

{Steelers Striped Leg Warmer}

Steelers Striped Leg Warmers (for dogs)

Ravelry Pattern Page Link

  • Suggested Yarn: I Love This Yarn! (available at Hobby Lobby) or other aran/worested weight yarn (2 colors)
  • Yardage needed: Specifically, not much. I don't have the exact yardage calculated. I'm a slacker.
  • Materials: US 7 dpns (or size needed to obtain gauge), tapestry needle
  • Gauge: 5 stitches and 7 rows over 1 inch in stockinette stitch
  • Finished dimensions: 8" around top cuff tapering to 6" around bottom cuff and about 9" in length

The written pattern is for the measurements listed above. However, this equation should help you resize the pattern for other sized pets.

Customizable Equation

From your gauge swatch: ____ stitches per inch _____ rows per inch

From your pet: _____ circumference of leg just under the elbow joint (I'll call it upper leg)

_____ circumference of lower leg just above wrist (above the side nail thing)

_____ length of arm from elbow to wrist

Cast on amount:

___(stitches per inch) x ___(circumference of upper leg) = ____* Make the total a multiple of 4

Number of decreases needed:

___(stitches per inch) x ___(circumference of lower leg) = ____* Make the total a multiple of 4
(upper leg total) - (lower leg total) = ____ number of decrease stitches / 2 = ___ number of decrease rounds Space the decrease rounds between 2-4 rounds of stockinette depending on the length of the leg and how drastically it tapers.

Pattern

Loosely cast on 32 sts in color A. Separate over 3 dpns. Needle 1 has 8 sts, needle 2 has 16 sts, needle 3 has 8 stitches. Customized sizing instructions in (red). Divide cast on stitches over 3 dpns with 1/4 of the total stitches on needle 1, 1/2 on needle 2, and 1/4 on needle 3. I decrease at the beginning and end of needle 2 thus the extra stitches on that needle.

Rows 1-6: (Color A) *k2, p2*

Rows 7, 8, 9: (Color B) Knit all stitches

Row 10: k8 (all of needle 1), ssk, k12 (to last 2 stitches on needle 2), k2tog, k8 (to end of round)

Rows 11, 12: Knit all stitches

Row 13: (Color A) Knit all stitches

Rows 14: k8 (all of needle 1), ssk, k10 (to last 2 stitches on needle 2), k2tog, k8 (to end of round)

Rows 15, 16, 17: Knit all stitches

Row 18: k8 (all of needle 1), ssk, k8 (to last 2 stitches on needle 2), k2tog, k8 (to end of round)

Rows 19, 20, 21: (Color B) Knit all stitches

Row 22: k8 (all of needle 1), ssk, k6 (to last 2 stitches on needle 2), k2tog, k8 (to end of round)

Rows 23, 24: Knit all stitches

Rows 25-30: (Color A) Knit

Rows 31-36: (Color B) Knit

Rows 37-42: (Color A) Knit

Rows 43-48: (Color B) Knit

Row 49: (Color A) Knit

Rows 50-54: *k2, p2*

Bind off loosely. Weave in ends

*~*~*~*~*~*~*~*~*~*~*~*

As expected, Clicky the Moose and Black-Eye Pea have asked for leg warmers of their own. Moose has requested leg warmers to replicate the socks from the team's throwback jerseys, while Pea wants to represent for her favorite player Troy Polamalu. The patterns to those designs will be added as they are completed. =]

Saturday, July 10, 2010

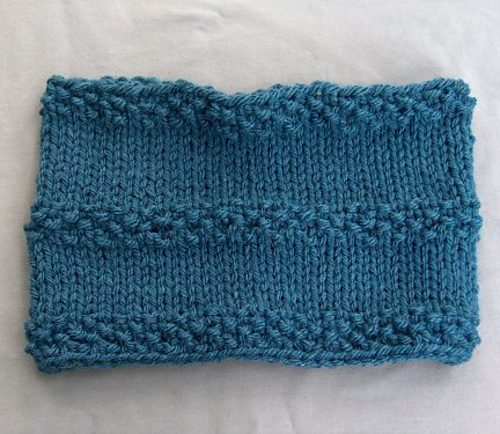
FO: Charity Cowls

{Cowl'd and Frosting Morning by Kelly Herdrich}
The Knit Black and Gold Ravelry group I belong to is centered around Steeler football and knitting (obviously). During the off season we've had monthly knit-a-longs (KAL) for different projects. Hats, socks, pet stuff, etc. June was charity knitting. One of the members is collecting cold weather wear for the homeless and suggested we make items for that. I thought cowls would work perfectly for this. So I made two. Cowls may be my new favorite thing to knit.
{I love seed stitch}
This was knit from left over Lion Brand Jiffy in Indigo. It is knit on US 13 which made it go super quick! Started and finished in the same day. This cowl looks much better on Dirty. It is a little on the big side for me. His beard really sets it off.
{The Guy Next Door by Devin Fredrickson}
Poor color accuracy, but the stitch pattern shows much better in this photo. This is leftover Caron Simply Soft in Autumn from the Lacy Hat knit as a gift for one of our nieces. See, more knitting stuff I made and happily gave to others!
{Better color accuracy here}
I had to put on an a t-shirt for the photo shoot. I tried with the tank top I was wearing but it looked ridiculous. In case you were wondering:
t-shirt + cowl = roasting
The things we do for good photos. =]

Friday, July 9, 2010

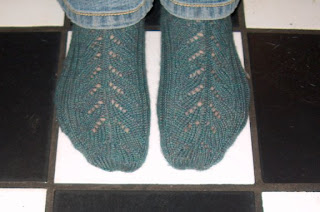
FO: Shelves Upon Shelves Socks

{Shelves Upon Shelves sock pattern by Erica Lueder aka Dreams in Fiber}
Whew! What I thought would take 2 weeks and would make a great birthday gift for my friend Susan actually took 2 months and won't be on any feet but mine. I know, I am awful. I'll make her something pretty soon!
{With Eye of Partridge heel. Love it.}
I just can't give them up. And, I think they are a little to out there for her. She is more classic and subtle. Sure, I can spin it a million ways, but I am still awful. I have made socks for other people and happily gave them away, but I didn't like them near as much as these. Just awful. Shameful!
{Side by side}
Anyway, when we were kids she pushed my down while roller skating because I wouldn't share my ice cream cone. I have a scar on my knee to prove it. Now were even. =]
{Pea agrees with me. See, she's guarding them.}

Monday, March 8, 2010

Got a yard?

Rebecca Yaker and Patricia Hoskins, the authors of One Yard Wonders are looking for submission for their next one yard wonder book. All the information is found here.

The concept of the next book is what projects can be made with a yard of a specific kind of fabric. Submit your idea online by April 1.

{Crafty Carry-Along Bag holding my sock yarn while I soak up the last bit of sun}

I put my submission in today. I made three Crafty Carry-Along bags out of lavender voile. They are all different sizes and have a loop and clip for easy transport. I hang the clip from my belt loop and the yarn slides right out the top. These were made because I got tired of sporting a nice, handmade tote bag but carried my knitting in old resealable bags. Now I have cute bags for my knitting projects, too. =]

Thursday, March 4, 2010

Keeping warm(er)

I have also been knitting a lot lately. The proof.
As I mentioned I also cast on for an Odessa Hat with a Bamboo Wool bend from Moda Dea in Chili Pepper Red. It is the first time I have knit with beads and I really like it. The hat fits well and keeps my head warm with out being itchy.

On it's first trip out of the house on my head it got a compliment from the lady behind me in the checkout line. She asked where I bought it. When I told her I made it her eyes popped out of her head and she said it was beautiful. I don't know about beautiful, of course there are mistakes, but I sure do like it.
{My Ravelry project}

I was also able to finish my French Press Slippers for the Ravelympics. For the first thing I made to be felted it's not too bad. I made the seams too bulky which made the toes a bit bumpy, but they work just the same. They are cute, pretty easy to knit and warm.
{Gigantic pre-felted slippers}
The felting was a trip. Your supposed to use your washing machine with the hottest water possible. Our hottest water is quite chilly since we don't have the washer connected to the water heater. I boiled pots of water on the stove, dumped them into a 5 gallon bucket and hauled it to the washer. I also learned that if you turn off the water line to the washer it won't start agitating no matter where you set the dial. I had to add a small load of cold water to get it going but it didn't seem to hurt the felting process.
{Slippers in action}


I used a pair of fabric covered buttons I received last year in a swap package from Erika. I was waiting for just the right project for the buttons and these slippers are it. I wear them all day everyday when I am home. This pattern will definitely be knit again. =]

Thursday, February 11, 2010

Knitted hats for Christmas

Yeah, I'm going to talk about Christmas gifts in February. I've been busy. ;]
Last Christmas was going to be the year of gifting knitted hats. I had plans to make eleven hats. Five got finished and only three before Christmas, but I have been forgiven.
For budget and both the mamas' sanity I chose acrylic yarn for all the hats. I didn't want to taint the gifts by adding a bunch of washing/drying stipulations causing the hats to either not get worn or ruined in the wash. Or have the mamas dread getting knitted gifts.
First up was the Button Tab Hat for our 6 year old niece. It is the second time I used this pattern. It is so quick to knit, easy and customizable. Three of my favorite aspects of a knitted object. I had to reduce the number of cast on stitches by 10 to make it fit a child's head, but that was easy. The brim is (my favorite) seed stitch and the button is a cute little lime green flower. The yarn is Vanna's Choice by Lion Brand in Purple Mist on US 6 dpns.
Next was the Lacy Rib Hat by Heather J. Spellman for our 10 year old niece. When it's stretched out a bit on her head you can see the lace pattern better. This was fun to knit. The pattern had just enough challenge to it to keep it interesting without being too trying. I did make some mistakes, but they blend in pretty well. This time I used Lion Brand Vanna's Choice in Seaspray Mist on US 6 dpns.
I actually had to do the picot edging twice. It was the first time I tried to make one and I didn't pick up the stitches from the cast on edge evenly and it got all wonky. Wonky can be great in quilt blocks, not so much in hat edging. The second go round was much better. I used stitch markers to keep me on track.
For our final niece I made the Lacy Hat. (Non-Ravelry link to pattern) The recipient is 8 years old and her favorite colors are red and black. I think this is may favorite of the three hats for our nieces. Again, the lace pattern is shown better when it's worn, but it is so cute. The picot edge for this was a breeze applying lessons learned. I got into a nice flow with the gull wing lace pattern. The yarn in Caron's Simply Soft in red (Scarlet, I think, is the correct color name). The ribbon is simple black satin which keeps the hat from looking too cutesy. She is 8 after all. ;]
{My Ravelry Link for the blue and the yellow hat for my friends' 5 and 3 year old boys}
I've had this hat in my queue for over a year. I loved it from the first time I saw it, but didn't have the skills (or balls) to make it before now. (On a not-completely-unrelated topic I have decided to take more risks knitting. There is really nothing to lose. I don't consider the time lost as I am learning either how-to or how-not-to do something. The project can always be frogged and the yarn saved for another project unlike sewing where if you cut wrong it can really screw things up. I cut it twice and it's still too short comes to mind. That doesn't happen with knitting. Love it. Back on topic.)
I didn't have a great handle on the Kitchener stitch for seaming the top and had no idea how to make the i-cord for the ties. Have several socks completed I was getting there with the Kitchener stitch (it's used to seam up the toes) and I pulled up the instructions for making an i-cord on knittinghelp.com and got to work.
I made the older boy's hat first. Yet again it was made with Lion Brand Vanna's Choice yarn but in Denim Mist this time. Blue has been his favorite color since I asked him for the first time when he was three.
I was so excited to get them both finished and in the mail I forgot to take pictures of the hats. Their mama took an appreciation photo for me. He's got the hat on backwards in the photo which is why the ear flaps are covering part of his face. However, it kind of shows why this is called Triceratops hat. It comes to three points at the top.
His little brother wanted a yellow hat, but it is hard to find yellow that isn't overtly baby yellow or traffic sign/day-glo yellow. Lion Brand Vanna's Choice Baby in Ducky seemed like a good shade of yellow. As I got stitching though I thought it was leaning towards being too baby-ish. I pulled out some light blue Lion Brand yarn from my stash and used it to make a 1-1/2" wide stripe on the top, the ear flaps and ties. It think it brought it back to kid-style.
Since then I have cast on a dish washing cloth in a pattern from the Vogue Stitchionary called Tiny Bamboo, the Odessa hat (with beads, see risk taking above) for me in an awesome Bamboo Wool from Moda Dea and have to cast on at least 3 of those other hats which are now intended as birthday gifts (in February, why do I keep doing that?).
Oh, yeah, and I joined Team Sasquach in the Ravelympics (Ravelry + Olympics = Ravelympics) starting when the official Olympic torch lights tomorrow. Planning to make my first felted project. Some super cute slippers. Gotta get stitching. =]

Wednesday, December 2, 2009

Socks and a cat...but not a cat named Socks

That title may not be true. I don't know what the cat's name is, but I saw this on the way home last week. I was stopped at a red light downtown and saw the cat watching traffic from the window. Amazingly I had the camera with me and was able to zoom enough to see it clearly.

{Kitty watching the traffic below}
I finished my Through the Loops Mystery Socks. Although they are far from perfect I *love* them. They are the first pair of socks I ever finished. I used an alpaca/wool blend yarn that is delicious feeling on my feet.

{Pair doesn't have to mean the look the same}

With these socks I learned how to properly make yarn overs and read from a chart (love that too). Since I hadn't learned to make yarn overs I took for granted that all knitting books would explain it correctly. Not so. That's why the legs look different. The right one (in the photo) was made with incorrect yarn overs and that's why the ribs don't line up. It just looked wrong and after seeing progress photos on Ravelry I found out it was. After more research I learned how to yarn over properly so the foot looked better. Since I don't wear socks and shorts, they will look good under my pants.

{Much better}

My project link on Ravelry.
Mystery Sock pattern as a free Ravelry download which is from Kirsten Kapur (her website).

Now to find cute shoes to show them off. =]

Sunday, October 11, 2009

I Like Having More Crafty Time

For anyone who cares: Later in this post I am going to show a picture of my cuff from the
Through the Loops 2009 Mystery Sock. It will be directly after the part about my Snip.Sew.Send. quilt. You've been warned. ;]

My work schedule has changed a bit and I now have more free time which means more time to sew and knit and clean our house. Oh, yes, it is usually in that order.
{Dirty's first sock}

I started this sock in January. It is the first sock I have tried to knit and I am glad that I finally finished it. Although I didn't work on it very consistently it did seem to take forever to get enough length in the foot. I did a little searching online and learned that I was not knitting properly. Instead of inserting the needle left to right in the front, I was going right to left in the back resulting in every stitch being twisted and tight.

{What you can't see is that my foot is turning purple}

Due to that, this sock has NO stretch and barely fit my foot and started to cut of circulation in my foot after wearing it for about 2 minutes. No way is it going to fit Dirty's foot.

{Sock 2 is going much better}

I cast on for the second sock with US 4 dpns instead of the 3s I was using before. I also adjusted my knitting technique which is making a huge difference. This one has stretch and potential. Not to mention I am using about half as much yarn and about a third of the time I spent on the first. I will frog the whole first sock and make a matching pair for him.

Ravelry info here and the pattern tutorial is great and is here.


{Rainbow Button Tab Hat}


OK, so it is 90 degrees today with 100% humidity and I really won't need a winter hat for about 4 months I couldn't help but cast on for the Button Tab hat by Marcie Nishioka. (Thanks for sharing yours, Heather.)


I am using gifted acrylic yarn for this so it won't be super fancy, but I am hard on my hats when I do get to wear them. It will be permanently fixed to my head for about 3 months and will no doubt get grass clippings, concrete dust and who knows what else on it. I prefer to just throw it in the washer rather than having to hand wash and air dry a hat. I think it will be OK. I am not much of a fabric or yarn snob. I just use what I have for the most part. My Ravelry info is here.

{The layout for a stacked books baby quilt}

Thank you for all your suggestions on how to showcase a fabric in a quilt. I really liked Anne's suggest of a coin quilt, but uniform straight lines scare me. And the fright makes me sew crooked. So I took Anne's suggestion and tweaked it a little with my style and decided to make a stacked book quilt. I took inspiration from this quilt and although I think there is a written pattern for this I am winging it.

{Left stack sewn and needing a good trim}

I am using a mix of new (Heather Ross VW buses on blue and Amy Butler Full Moon in the light blue/gray colorway), scraps and thrifted/flea market find fabrics. The white is from a twin-size sheet. I am loving how this is turning out. I construction is going smoothly and I get more and more happy with it as I go. Thankfully, the baby isn't due for a few more weeks and I may get this finished before the birth.

{My Snip. Sew. Send. Quilt: the front}

This new schedule also gave me a little time to work on my Snip. Sew. Send. quilt. I have the top finished (except for trimming it it size) and am working on the back.

{A closer view of the blocks}

I am very happy with this quilt so far. It will be the biggest quilt I have made so far and I really want to get it finished and start using it.

{Probably layout for the back}

The back will be something like this. Probably three strips breaking up the purple on the back. The strips will go all the way across, I think. Kris and Gretchen both sent back two blocks so they have one on the front and one in the strips on the back. So, so happy with this.


***SPOILER ALERT***

If you don't want to see my cuff for the Through The Loops 2009 Mystery Sock stop scrolling now.


{The mystery cuff}

I am so happy that I decided to participate in the Through The Loops 2009 Mystery Sock. Each Thursday Kirsten posts a portion of the sock pattern. First was the cuff, pictured above and last Thursday was the leg, which I am working on. I like having the pattern in sections. It makes it easy to manage and very exciting. When I was younger I loved grab bags and those games where you close your eyes and stick your hand into something that feels gross (like peeled grapes or cold pasta). I would have been horrible on Let's Make a Deal. But Mystery Socks are a win-win.

I am using Alpaca with a Twist yarn in a really pretty green/purple colorway that I did buy special for this project. I validate it because I did not have fingering weight yarn in my stash. My Ravelery info is here.

So far the sock looks pretty good to me. It is the first project where I have to do yarn overs and thanks to my trusty Stitch n' Bitch by Debbie Stoller I've got that technique in my knitting bag now.

So that was a couple of pretty productive weeks. Hopefully in the next few weeks I'll get some things finished. =]

Friday, March 27, 2009

BTRSswap Charming Handbag Completed

My pieces of this round of the BTRSswap is now complete. I finished the bag itself about a week ago, pushed into early motivation by the ladies behind Twin Fibers. While wasting time I saw their creations on the BTRS flickr pool. I liked both of them so much it gave me the inspiration and motivation to get sewing. I can hardly believe I am finished with days to spare. I am usually a last minute, fervent sewing to meet the deadline kind of swapper.
For this bag I used an unbleached cotton for the outer bag and a gorgeous Caribbean Blue velvet ribbon and bow. The color of the ribbon really pops against the simplicity of the bag.
Along with the bag we were asked to slip in a few goodies totaling about $5. I tucked in a package of tropical colored tassels, cool blue vintage buttons and a small hand knit dish washing cloth. I prefer smaller washing cloths so that the dish water doesn't go flying around while washing the dishes. (Yes, I hand wash. Partly because I like it but mostly because we don't have a dishwasher.)


The inside of the bag is an Amy Butler fabric with an aqua background and mustard yellow and white pattern. Amy Karol's pattern doesn't call for a pocket, but I really like to have pockets in my handbags so I added one. The pocket as a trim of the same outer fabric sewn across the top so the pocket blended with the inner fabric but didn't get lost. I also added a little ribbon tie for a closure. It's all packed up and ready to head to it's new home on the opposite end of the country. Pretty much as far away from here as you can get without crossing an ocean. Or Canada.

Here's a little close up of the wash cloth. It has a seed stitch border all the way around and a little knit/purl checkerboard pattern in the center. It's made from Peaches and Cream cotton yarn in yellow.

I am a really slow knitter but this was pretty quick. I may make myself one, too. After I get a sock finished...

=]