Tuesday, December 18, 2012

Tutorial: Ornament Wreath

I made an ornament wreath for our newly painted house.  I just love it...both the house paint and the wreath.  The wreath took about 15-20 minutes to create and I can make at least 1 more wreath with the leftover supplies.
Here is a quick tutorial:
Materials/supplies
*About 32" Multi-purpose wire (I used 16 gauge, but its a little too thin.  20 gauge would be better. I got this from Lowes)
*70-80 ornaments of all sizes (I used half a set of 101 piece set Martha Stewart Living Shatter-Resistant Ornaments from Lowes and 20 Holiday Time mini shatter-proof ornaments from Walmart)
*15-20 inches of 1" width ribbon
*Stocking charm letter (from Walmart)
*Wire cutters
*Needle nose pliers

Procedure:
1. Cut wire to 32". Use pliers to make a loop at one end of the wire. This works as a stop and part of the closure.
2. Begin threading ornaments onto the wire. I used 2-3 big ornaments then a mini one to fill the gaps.
3. Keep threading until about 1-1/2" of wire is left.
4. Use the pliers to hook the end through the loop to create a circle. Crimp the wire closed.
5. Wrap the ribbon around the closure.
6. Attach the letter charm.
7. Tie a bow and hang the gorgeous wreath on the door.

Easy peasy. This wreath is a great last-minute gift, hostess gift or it-looks-like-you-spent-all-day-making-this gift. The whole thing cost me about $30 and I have enough wire and big ornaments to make at least one more wreath.
I just love this wreath. It makes our front porch festive and welcoming. I smile each time i see it. =]

Wednesday, August 8, 2012

The Daily 5 has me super excited!

The Daily Five: Fostering Literacy Independence in the Elementary GradesThe Daily Five: Fostering Literacy Independence in the Elementary Grades by Gail Boushey
My rating: 5 of 5 stars

Wow. That's all I can say. Wow.

First, I just read a professional development book in a few hours. Second, it was awesome! I am very interested in putting the Daily 5 into practice this school year. I do or have done most elements of the process, but not all at the same time and not with the population of students I have now.

I quickly and deeply related with their stories of assigning (and grading) mounds of busy work, then not even being able to have a successful, uninterrupted small group. I spent WAY too much time creating and managing center activities. Days, months, years...just to do it again the next year...and hate it. There. I said it. I am a primary grade teacher and I HATE CENTERS!

The Daily 5 seems right in line with Common Core standards (which we have adopted this year) and fosters independence. I love that students have choice, learn to work independently and take stock in their own and their classmates learning.

My favorite, and I am sure will be the most used, section of The Daily 5 is the appendix. The authors included easy to follow charts for launching each component and an idea for how te first several weeks of training/practice could play out.

The Daily 5 is simple and efficent. The research base is sound and strong. I cannot wait to start implementing The Daily 5. This may be my most productive year yet! =]

View all my reviews

Thursday, April 19, 2012

FO: Spring Ruffle Dress from Made by Rae and Sew Mama Sew

{Spring Ruffle Top lengthened to a dress}
I finally finished my second go at the Spring Ruffle Top. This time I lengthened the pattern to dress size. I included the ruffle sleeves and a ruffle around the bottom hem. The fabric is some kind of blend. It came in a big box Papa Gino got at a flea market. Yea, free dress! It is the perfect spring dress. Nice and light with lots of color. =]

Friday, March 9, 2012

FO: Simplicity 2243

LOVE!
Fabric purchased at fabric.com. Its a cotton jersey knit. I didn't check the stretch and cut the fabric wrong, but that was all me. I still love the dress.

My full review is on PatternReview.com.


FO: Simplicity 2209 Lisette Passport Dress

I cannot say enough good things about this pattern from Lisette for Simplicity. It was one of the BEST commercial patterns I have ever sewn. Everything was simple and straight-forward from cutting the pattern pieces, to making small modifications, to actually sewing the dress.

I made it a few weeks ago for a special night out with my mom and grandma. We went to a dinner theater together. The whole night was really great.

The dress is really comfortable and versitile. I ended up lining the bodice and not using the interfacing pieces. The bodice fabric I chose was a bit see through and I really wanted a slip-it-on-and-go dress. Wanted, hell. I need that with as often as I run late in the mornings.

More details in my review at Patternreview.com.

Photos of Simpicity 2209: Lisette Passport Dress and Jacket ~ View B for dress


Sunday, April 17, 2011

Fabric + Elmers Glue + First Graders = A whole lotta fun

I teach first grade. I love it. Each month a book is chosen for a school-wide "Book of the Month". We read it several times, do an activity and display it in the classroom. This month was my class's turn to display in the main hallway. I know...exciting! This month's book is Abuela by Arthur Dorros and illustrated by Elisa Kleven.

It's hard to tell from this picture, but the illustrator used fabric and trims in her pictures. The grandmother's purse is a piece of lace, the top of the building on the lower right is ribbon, etc. Scraps of fabrics...be still my heart! I know where to get a few (bazillion) fabric scraps.


It took 3 fabric loving sessions, but the kids made pictures of themselves and their grandmas (Abuela in Spanish) or grandpas doing something special.


I present the masterpieces:


Thursday, April 14, 2011

FO: Simplicity 2591 Dress

I made this dress: I wear it with these shoes: I freaking love this outfit. I would wear it everyday if it weren't 90 degrees *or* if I didn't sweat like a pig. =] PS: You can read my review of the pattern here.

Monday, January 17, 2011

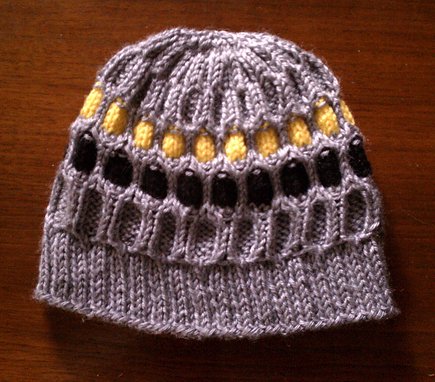
NFL Breast Cancer Awareness Knit Beanie **Free Pattern**

Several months ago one of the members of the Knit Black and Gold group on Ravelry posted a photo this beanie. She had seen it at a game, but knew it could be handmade for far less than the $20+ price tag. I worked on reverse engineering it off and on and, with a little help from other Steelers fans, we got it all worked out.

*~*~*~*~*~*

This pattern was reverse engineered with the help of Ellisha (ish174), Annie (trainergirl15 and Liz (steelerbear). The original beanie was sold during the NFL’s 2010 “A Crucial Catch” Breast Cancer Awareness campaign. Proceeds from merchandise sales benefited the America Cancer Society and other team charities. If you choose to knit this hat, please consider knitting another and donating it to your local chapter of the America Cancer Society, a local breast cancer treatment facility or one of your favorite team’s charities.

*~*~*~*~*~*
Materials
  • Worsted weight yarn in 3 different colors
  • US 8 needles – 16” circulars and/or dpns
  • Gauge: 6 sts/inch in pattern on US 8

Abbrivations

  • K-Knit
  • P-Purl
  • p2tog - purl 2 stitches together
  • k2tog - knit 2 sts together
  • ssk – slip 2 sts knitwise then knit them together
  • C1 over 2 right - Slip 2 sts to cable needle holding in back, K1, P2 from cable needle (needleless-hold yarn in front when slipping)
  • C1 over 2 left - Slip 1 stitch to cable needle holding in front, P2, K1 from cable needle (needleless-hold yarn in back when slipping)
  • MC – main color of yarn
  • CC1 – contrasting color 1
  • CC2 – contrasting color 2

Tackling Dummy Stitch Pattern

Round 1: *C1 over 2 left, C1 over 2 right* to end
Rounds 2-7: *P2, K2, P2* to end
Rounds 8: *C1 over 2 right, C1 over 2 left* to end
Rounds 9-14: *K1, P4, K1* to end

Instructions
CO 108 (120) sts with MC, join in the round

Work *K2, P1* for about 1-1/2"

Set up row: *K1, P4, K1* to end of round

Work rounds 1-8 of Tackling Dummy Stitch Pattern once in MC

Rounds 9-13: *K1 with MC, K4 with CC1, K1 with MC* to end

Round 14: With MC *K1, P4, K1* to end

Round 15: With MC *C1 over 2 left, C1 over 2 right* to end

Round 16-20: *K2 with CC2, K2 with MC, K2 with CC2* to end

Round 21: With MC *P2, K2, P2* to end

Continue working Tackling Dummy Stitch Pattern with round 8 using just the MC.

Complete a total of 5 pattern repeats before decreases (1MC, 1 CC1, 1CC2, 2 MC)

Work just round 1 of Tackling Dummy stitch pattern before starting decreases.

**Decreases for 108 sts ONLY**
Decrease row 1 (D1): Move last stitch in previous row to be first stitch of decrease round. *p2tog, p1, k2, p1* (90 stitches remain)
D2: *P3, K2* to end
D3: *p2tog, K2, P1* (72 sts remain)
D4: *p1, K2, P1* to last stitch
D5: move last of round to first stitch of this round, *p2tog, k2* (54 sts remain)
D6: *ssk, k2tog* (18 sts remain)
D7: k2tog to end (9 sts remain)

** Decreases for 120 sts ONLY **
D1: move last st to be first stitch of the round, *p2tog, p1, k2, p1* (90 st)
D2: knit pattern as established *p3, k2*
D3: *p2tog, k2, p1* around (72 st)
D4: knit pattern as established *p2, k2*
D5: move last st to be first st of the round, *p2tog, k2* (54 st)
D6: knit pattern as established *p1, k2*
D7: *k2tog, k1* around (36 st)
D8: k all stitches
D9: *k4, k2tog* around (30 st)
D10: *k3, k2tog* around (24 st)
D11: *k2, k2tog* around (18 st)
D12: *k1, k2tog* around (12 st)
D13: k2tog (6 sts)

** Finishing **
Cut the yarn leaving enough to thread through the remaining sts. Sinch live sts together and weave in all ends. =]

Thursday, October 7, 2010

do.Good Stitches - September - Trees

*Sigh* I really don't know how I get so behind. I don't think Midge and I have sat down together in over a month! I have been knitting a lot...and working more...and actually keeping the house clean. I guess sewing was the one that had to give.

September's theme for do.Good Stitches was trees. I so loved making houses for other bees. These trees were just as fun and a nice little tweak to a popular new quilt.

I think the tree to the left is a nice climbing tree and has a great place for a bird to make a nest. The pine tree on the right is silly and slightly wonky and interesting to look at with all the different fabrics.

Saturday, September 25, 2010

Dress Plans

I was running a few minutes early for work one day so I stopped by the Goodwill that is on the way. Only having a limited so I headed straight for the linens. This plaid fabric caught my eye right away. I got about 4 yards for $1.99! And it matches my new favorite shoes (which I also got new from a different Goodwill, but they are also sold at Target).
{Photo from Target.com}
My plan is to make Simplicity 2591 version C. I like the retro look, full-ish skirt and coverage on the top. The fabric is fairly light-weight and should be good in warmer weather. I plan to get some fun, bright tights to wear under the dress in the fall and winter. I have already been thinking of knitting this cardigan in yellow or pink to go with some other dresses and it should work with this dress, too.

Hopefully I will have the time to make this dress this weekend. But that will have to be after mowing the lawn, sweeping the floor (dang these dogs shed!) and staking our tomato plants. =]

Thursday, August 19, 2010

It's been handled

{Mouse needs a better look}
This bag is about 10 months in the making. The handles and fabric were part of the haul from Roger's Flea Market last August. I matched the fabrics and handles then pinned out a rough design last October. It promptly got "cleaned up" and put in a box, put on a shelf and forgotten about with two or three of its friends.
{Camera 1}
I discovered it again while looking through my WIPs box. Over the past couple days it was sewn together, ripped apart and resewn. Standard for this visual/tactile learner.
{Camera 2}
This one is mine, but I think I will utilize the other handles I have and make more of these bags for my Etsy shop. Maybe even a tutorial. We'll see if I can remember to take photos during the next construction. And I think I will make the handle casings a little bigger. And maybe a constrasting fabric. Or some fancy trim. And maybe not sew down the pleats. And maybe a little taper in on the opening to finish off the hexagon shape. Hmmm.
{All the crap I lug around}
It is large enough to hold my cell phone, keys (on a little leash ala Anne), wallet, notepad, two pens, two Sharpies (actually Shoupies, but I digress), cash (now gone), chap stick and multitude of change in the bottom. All that without looking bulky when closed.
{RTG}
=]

Wednesday, August 18, 2010

do. Good Stitches ~ August

This block started very differently. I had planned to use this tutorial from the Purl Bee blog, but I couldn't make it fit into the correct size requested in the bee. I did the math wrong.

I ended up just playing with the triangles and squares until I got something I liked. In order to get to the correct 12" x 12" size I added a thin border of red and a thicker border of aqua.

Find out more about this online charity bee on the flickr page. I believe Rachel is still looking for members for spin off circles. =]

Monday, August 16, 2010

FO: Frock Camisole


{Frock Camisole aka Flowy racer back tank}
The other day I finished my Frock in Violet. This is the first garment I have ever knitted and I think it turned out pretty dang good! Racer back tops aren't usually that flattering on me, but I went for it anyway and I am glad I did.
I used nearly 3 whole skeins of Lion Brand Cotton-Ease in Violet for the medium size. One of the skeins is actually one of my first yarn purchases from when I first learned to knit a few years ago. I knew I liked the color, but never knew what to make with it.
{The back}
I only made two alterations to the pattern. I used 12 stitches for the straps instead of 8. Then I only made them 10" long instead of the 11-3/4" as in the instructions. I needed shorter straps to pull up the armholes. They hung too low and showed my undergarment. Eek!
Next time I would only cast off 4 stitches for the armhole and use them in the straps. I had to use some of the neckline stitches for the straps and I think it would look a little better with a wider neckline.

My Ravelry link, if you're interested. =]

Tuesday, August 10, 2010

50 cents + Flea Market = Happiness

{Better Homes and Gardens Sewing Book}
{Inside cover...in all it's 1960s glory}

This little gem cost me 50 cents and I have already gotten return on my investment. I must have spent an hour flipping through this book smiling at the sketches, giggling at the swimsuits and marveling at how far sewing has come and how much it has stayed the same.

{Convenient sizing charts}

The sizing carts measurements may be the same, but we all know the size number has changed. This is still really useful, of course for vintage patterns, but also for sizing items I make for my nieces who live far, far away.
{She is so happy with her striped skirt}

The sketches throughout the book kill me. The ladies all have different looks. They are demur, classy and sophisticated. Project Runway would judge them as: She looks fun and like the kind of girl that everybody wants to know.
{Oh, no!}

{Ahh, that's it}
In the cutting section the authors discuss how to layout pattern pieces to get check, plaids and stripes to line up at the seams. These cute ladies show wrong and right examples. I love the wrong girl's expression. =O

{The only brunette!}
I didn't realize it until I saw this little girl, but she is the only brunette in all 360 pages!
{Wardrobe planning ideas}
I am also loving the sportswear section. The garments considered sportswear are hilarious to me. A shift dress is sportswear. Women's and men's trousers are sportswear. Pleated skirts and halter tops are sportswear. Halter tops! I still giggle at that.
{Swim suit construction}
I do have plans on making a swim suit for myself, but I promise, it won't have a zipper. =]
Do you have a good vintage sewing guide book?